
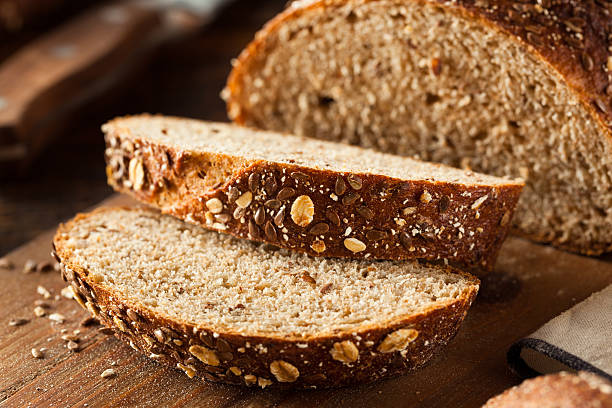
Who says whole wheat bread has to be dense, dry, and tasteless? This Classic 100% Whole Wheat Bread Recipe features the delightfully nutty taste of wheat in a fine-grained, moist, and faintly sweet loaf. In this post, you will learn how to cook the perfect Classic 100% Whole Wheat Bread with Chef B!
Classic 100% Whole Wheat Bread Recipe: A Nutritious and Delicious Homemade Loaf
When it comes to homemade bread, there’s something special about baking your own loaf from scratch. The process of combining simple ingredients to create something so satisfying is incredibly rewarding. And when you’re baking a loaf of Classic 100% Whole Wheat Bread, the benefits go beyond just taste. This recipe delivers a soft, nutty, and slightly sweet wheat bread that’s perfect for sandwiches, toast, or just enjoying with a pat of butter. Whether you’re an experienced baker or trying your hand at homemade bread for the first time, this easy-to-follow recipe will guide you every step of the way.
Why Choose 100% Whole Wheat Bread?
Whole wheat bread often gets a bad reputation for being dense and dry, but this Classic Whole Wheat Bread recipe proves that doesn’t have to be the case. By using 100% whole wheat flour, you get a soft, hearty loaf that’s packed with flavor and nutrition. Whole wheat flour contains all parts of the wheat kernel—bran, germ, and endosperm—which means it’s loaded with fiber, vitamins, and minerals. It’s a great alternative to white bread, may have been stripped of many of these nutrients during processing.
Not only does this recipe offer a healthier option, but it also brings out the wonderful, nutty flavors of whole wheat that are often overshadowed in store-bought loaves. The result? A loaf that’s moist, slightly sweet, and incredibly satisfying.
Jump to RecipeHow to Cook Classic 100% Whole Wheat Bread: A Step-by-Step Guide
Making this 100% Whole Wheat Bread recipe is easier than you might think. Here’s a breakdown of how to cook this classic loaf, step by step:
- Start with the Ingredients To create this soft wheat loaf, you’ll need a few simple ingredients: lukewarm water, vegetable oil, honey (or molasses or maple syrup), white whole wheat flour, instant yeast, dry milk, and salt. Make sure you measure everything accurately for the best results.
- Mix and Knead the Dough The key to this recipe is giving the flour enough time to absorb the liquids. Once you combine all the ingredients, allow the dough to rest for 20 to 30 minutes before kneading. This makes the dough easier to handle and ensures a soft texture. Knead the dough for about 6-8 minutes by hand or 5-7 minutes in a stand mixer. You want the dough to be smooth and supple. If needed, add a little more flour or water to adjust the consistency.
- Let the Dough Rise After kneading, transfer the dough to a lightly greased bowl, cover it, and let it rise until it becomes puffy, usually 1-2 hours. Don’t worry if it doesn’t double in size—just look for a noticeable increase in volume.
- Shape the Loaf Once the dough has risen, gently deflate it and shape it into an 8-inch log. Place the dough in a greased loaf pan and cover it with lightly greased plastic wrap or a reusable cover. Let it rise for another 1-2 hours until it crowns slightly above the rim of the pan.
- Bake to Perfection Preheat your oven to 350°F (175°C) towards the end of the rising period. Once the dough has risen, bake it for 35-40 minutes. To avoid over-browning, tent the bread with aluminum foil halfway through baking. You’ll know it’s done when a digital thermometer inserted into the center of the loaf reads at least 190°F.
- Cool and Enjoy After baking, remove the bread from the oven and let it cool on a rack. For a soft, flavorful crust, rub the top of the warm bread with a stick of butter. Be sure to allow it to cool completely before slicing to avoid squashing the soft loaf.
For detailed step-by-step instructions, see the recipe card below.
Classic 100% Whole Wheat Bread Recipe
Equipment
- Stand Mixer or Mixing Bowl: For combining and kneading the dough.
- 8½”x4½” Loaf Pan: Perfect for shaping and baking the bread.
- Digital Thermometer: For ensuring the bread reaches the right internal temperature.
- Basting Brush: To apply butter for a soft crust after baking.
- Cooling Rack: For allowing the bread to cool properly after baking.
Ingredients
- 1 – 1⅛ cups lukewarm water 227g to 255g
- ¼ cup vegetable oil 50g
- ¼ cup honey molasses, or maple syrup, 85g
- 3½ cups King Arthur white whole wheat flour 397g
- 2½ tsps instant yeast (or 1 packet active dry yeast dissolved in 2 tbsps water in the recipe)
- ¼ cup King Arthur Baker’s Special Dry Milk or nonfat dry milk, 28g
- 1¼ tsps salt 8g
Instructions
- Weigh your flour or measure it by gently spooning it into a cup, then sweeping off any excess.
- In a large bowl of your stand mixer, combine all of the ingredients and stir just until the dough starts to leave the sides of the bowl. Let it rest for 20 to 30 minutes; this gives the flour a chance to absorb some of the liquid and the bran to soften, making the dough easier to knead.
- If kneading by hand, transfer the dough to a lightly greased surface, and, with your hands oiled, knead it for 6 to 8 minutes, or until it’s smooth and supple. If kneading in a stand mixer, attach the dough hook and knead for 5 to 7 minutes at low speed, until the dough is soft and smooth. Adjust its consistency with additional flour or water, if necessary.
- Transfer the dough to a lightly greased bowl, cover it, and let rise until puffy though not necessarily doubled in bulk, for 1 to 2 hours.
- Gently deflate the dough, transfer it to a lightly oiled work surface, and shape it into an 8-inch log. Place the log in a lightly greased 8½”x4½” loaf pan and cover the pan loosely with lightly greased plastic wrap or a reusable cover.
- Let the bread rise for 1 to 2 hours, or until its center has crowned about 1″ above the rim of the pan. Towards the end of the rising time, preheat the oven to 350°F.
- Uncover the bread, place in the oven, and bake for 35 to 40 minutes, tenting it lightly with aluminum foil after 20 minutes to prevent form over-browning. A digital thermometer inserted into the loaf’s center should register at least 190°F.
- Remove the bread from the oven and turn it out of the pan onto a rack to cool. For a soft, flavorful crust, rub the top of the warm bread with a stick of butter. Cool completely before slicing.
- Store the bread, well-wrapped, at room temperature for several days; freeze for longer storage.
Notes
Customizations:
- Sweetness: Add more honey or molasses for a sweeter loaf.
- Flour Variety: You can use a mix of whole wheat and all-purpose flour for a lighter texture.
- Milk Substitute: Use non-dairy milk like almond milk for a dairy-free option.
Serving Tips:
- Toast slices for breakfast with butter and jam.
- Use as a sandwich base for hearty fillings like turkey or grilled vegetables.
Storage Tips:
- Store wrapped at room temperature for up to 3 days.
- Freeze for longer storage—just slice and toast as needed.
Cooking Tips:
- Let the dough rest long enough to absorb the liquids fully for a smooth, soft dough.
- Always check the internal temperature—190°F ensures it’s fully cooked.
Make-Ahead Tips:
- The dough can be prepared a day in advance, allowing for extra rise time.
- Bake and slice the bread, then freeze individual slices for later use.
Nutrition
Tips for Making the Best 100% Whole Wheat Bread- Chef B Recomenadtions
While this recipe is straightforward, there are a few tips that can help ensure you get the best results every time.
- Choose the Right Flour: Not all whole wheat flours are the same. We recommend using King Arthur white whole wheat flour, as it produces a lighter, softer loaf compared to regular whole wheat flour.
- Adjust for Weather: The amount of water you need may vary depending on the weather and humidity. Use the greater amount of water in drier conditions (like winter) and the lesser amount in more humid months.
- Knead Thoroughly: Proper kneading is key to developing the gluten in the dough. This gives the bread structure, helping it rise properly and achieve a soft texture.
- Monitor Baking Time: Every oven is different, so keep an eye on the bread as it bakes. If the top starts to brown too quickly, tent it with foil to prevent it from burning.
Why Make Homemade Whole Wheat Bread?
There’s something incredibly rewarding about pulling a warm loaf of homemade bread out of the oven. Not only do you know exactly what’s going into your bread, but you also get to enjoy the fresh, nutty aroma as it bakes. Plus, this Classic 100% Whole Wheat Bread recipe is versatile—use it for sandwiches, toast, or as a side with your favorite soup. It’s the perfect addition to any meal.
Making your own bread also allows you to control the ingredients, ensuring you avoid preservatives and artificial additives found in store-bought varieties. Plus, it’s a great way to use your hands to create something nourishing and wholesome for you and your family.
How to Customize Your Classic 100% Whole Wheat Bread Recipe
While this recipe is a classic, you can easily adapt it to suit your tastes:
- Add-ins: Consider adding seeds (like sunflower or sesame) or nuts (such as walnuts or almonds) for extra texture and flavor.
- Sweetener: If you prefer a less sweet loaf, reduce the amount of honey or molasses. Alternatively, add more sweetener for a slightly sweeter bread.
- Herbs and Spices: For a savory twist, you can incorporate herbs like rosemary or thyme into the dough.
FAQs About Classic 100% Whole Wheat Bread Recipe
Q: Can I use all-purpose flour instead of whole wheat flour?
A: While this recipe is designed specifically for whole wheat flour, you can substitute part of the whole wheat flour with all-purpose flour. However, using all-purpose flour will change the texture, making it lighter but less hearty. If you want to keep the bread 100% whole wheat, stick to the original recipe.
Q: Can I make this recipe without a stand mixer?
A: Yes! You can knead the dough by hand if you don’t have a stand mixer. Simply follow the kneading instructions, using your hands to work the dough for 6-8 minutes until smooth and supple. It may take a bit more effort, but the results will be worth it.
Q: How can I make the bread softer?
A: If you prefer a softer loaf, you can add a bit more oil or honey to the dough. Additionally, avoid overbaking the bread, as this can make it dry. To keep it soft longer, store it in an airtight container or wrap it in a cloth once it cools.
Q: Can I use this recipe to make bread rolls instead of a loaf?
A: Absolutely! To make bread rolls, divide the dough into smaller portions and shape them into individual rolls. Place them on a greased baking sheet, allowing space for expansion. Bake for 20-25 minutes at the same temperature, or until golden brown.
Q: How do I store homemade whole wheat bread?
A: Once the bread has cooled completely, store it in a breadbox or an airtight container at room temperature for up to 3-4 days. For longer storage, you can freeze the bread, wrapping it tightly in plastic wrap and aluminum foil. Just thaw it at room temperature when ready to serve.
Chef B Final Thoughts
This Classic 100% Whole Wheat Bread recipe is a game-changer for those who love homemade bread. With its soft texture, slightly sweet flavor, and nutty undertones, it’s sure to become a staple in your kitchen. Whether you’re enjoying it with butter, making a sandwich, or just nibbling on a warm slice fresh from the oven, this bread offers the perfect balance of taste and nutrition. And because it’s 100% whole wheat, you’re also getting all the benefits of whole grains, making it a wholesome choice for any meal.
So, if you’ve ever wondered how to cook classic 100% whole wheat bread at home, this recipe is a great place to start. The next time you’re craving homemade bread, give this recipe a try—you won’t be disappointed!—Chef B never disappoints.
Make-Ahead Tips for 100% Whole Wheat Bread
If you’re planning ahead, you can prepare the dough and let it rise overnight in the refrigerator. This slow fermentation process will develop even more flavor, and you can bake it the next day when you’re ready for fresh bread. Just make sure to bring the dough to room temperature before shaping and baking.
This Classic 100% Whole Wheat Bread recipe is everything you want in a loaf—delicious, nutritious, and satisfying. Give it a try, and you’ll be amazed at how easy it is to bake your own homemade bread.
Tried this recipe? Don’t forget to share your success stories and tag us in your Classic 100% Whole Wheat Bread pics!

Hi, I’m Chef B! Passionate about all things culinary, I’ve spent years perfecting my recipes to bring bold flavors to your kitchen. Let’s cook up something delicious together!